
Contact Sales Now
Thank you! Your submission has been received!
Oops! Something went wrong while submitting the form.

Contact Sales Now
Thank you! Your submission has been received!
Oops! Something went wrong while submitting the form.

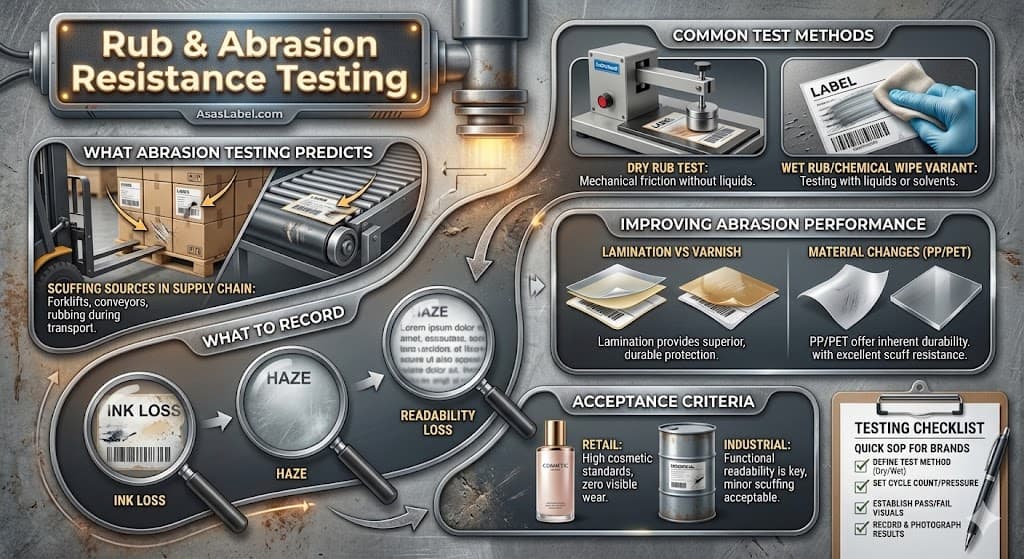
Packaging integrity relies heavily on the durability of printed information. When labels fail during transit or handling, the consequences range from aesthetic degradation to breaks in traceability. Abrasion and rub testing serves as the primary defense against these failures. This process of evaluating the rub resistance of printed materials ensures that product labels or packaging components remain intact throughout their lifecycle.
This abrasion resistance test process quantifies a material's ability to withstand mechanical action. It moves beyond subjective observation to provide data-driven quality testing results. By simulating real-world friction through scuff testing, brands can evaluate abrasion properties and anticipate how a package will perform before it reaches the retail shelf. Accurate testing helps the printing and packaging industry maintain high standards for printed labels.
Understanding the distinction between rub and abrasion is critical. Ink rub usually refers to the displacement of ink or coating through shearing forces. Abrasion typically involves the physical wearing away of the substrate material itself. Both mechanisms destroy value. An ink abrasion resistance tester is used to test the durability of printed materials against these forces, simulating typical wear and tear.
Industry standards for quality and durability often reference lab testing equipment known as the Sutherland rub tester or rotary abrasion tester devices. These tools apply a controlled weight and set number of cycles to a specimen or substrate. The testing results determine if packaging labels are fit for purpose or destined for rejection based on the resistance of materials to abrasion damage.
Testing protocols essentially act as a time machine for packaging engineers. They accelerate the wear and tear process to predict the condition of a printed material after rigorous distribution. A successful resistance test verifies that the ink system and coating adhere properly to the substrate under stress. This test simulates the abrasion resistance of printed materials over months of handling in just a few minutes.
Prediction centers on the interaction between the printed or coated surfaces and external surfaces. This includes interaction with corrugated cardboard, other containers, or automated handling equipment. The goal is to evaluate the abrasion resistance of printed materials and identify the breaking point of the printed ink layer or protective coating before mass production.
Data derived from these abrasion and rub testing procedures inform decisions regarding ink formulation. Harder drying inks or those with higher wax content often show better rub resistance of printed surfaces. Testing reveals if the current chemical composition is robust enough for the intended lifecycle and if the abrasion properties are sufficient for the packaging industry.
Furthermore, these predictive measures for label quality validate the curing process. UV inks that are under-cured will smudge or smear instantly under an ink abrasion resistance tester. Validating the cure level through a set number of cycles prevents batches of tacky or soft printed labels from entering the supply chain where labels must remain legible.
Scuffing does not occur in a vacuum; it is the result of rub and scuff interactions during logistics. Vibration during trucking is a primary culprit. As pallets vibrate, individual units rub against dividers or adjacent product labels with high frequency. This test simulates those conditions to ensure the abrasion resistance of ink is maintained.
Corrugated dust acts as an abrasive agent during this transport phase. The grit from shipping boxes settles between packages. Under the pressure of stacked pallets, this dust functions like sandpaper, rapidly accelerating the abrasion damage of high-gloss surfaces. Sutherland rub testing helps determine the scuff resistance required to withstand this sandpaper effect.
Manual handling introduces unpredictable variables. Warehouse staff wearing gloves or utilizing box cutters can inadvertently apply friction to label surfaces. Even the act of sliding a package across a conveyor belt introduces abrasion properties that must be accounted for. Evaluating the rub resistance ensures that the print quality survives these physical touchpoints.
Retail stocking presents the final hurdle for food packaging and consumer goods. Products are often shelved in spring-loaded push feeds or tight racks. The repeated removal and replacement of items create significant shear force on the label face, specifically damaging raised tactile varnishes or foil-stamped product labels, which requires high scuff resistance.
Standardized methodologies ensure that testing results are reproducible across different runs and different laboratories. Without a standard for abrasion, data regarding scuff resistance is meaningless. The printing and packaging industry relies on specific instruments that control speed, weight, and stroke length for an accurate abrasion resistance test.
ASTM D5264 is a frequent reference point for using the Sutherland rub tester. This test involves a mechanized process that is the industry benchmark for evaluating the rub resistance of printed materials on coated paper and paperboard. It eliminates human error by mechanizing the rubbing action, ensuring every set number of cycles is identical to the last.
Rotary abrasion tester instruments take a different approach. Devices like the Taber Abraser use weighted wheels that rotate over the test sample. This method is generally more aggressive and is used to test the abrasion resistance of printed materials at the substrate level rather than just evaluating the ink rub or surface coating.
Shear resistance testing helps evaluate coating adhesion. This test involves applying tape to a scored test area and removing it rapidly. While not a rub test strictly speaking, it is often performed in tandem with a sutherland rub test to verify that the ink is anchored well enough to resist being removed by abrasion or friction.
The dry rub test simulates standard package-to-package friction. A specimen of the label is mounted to the test area of the tester. A receptor block, usually wrapped in a similar sample label or unprinted white paper, is attached to the moving arm. This test involves consistent mechanical pressure to evaluate ink abrasion.
Weights are added to the arm to simulate stacking pressure. Common weights are 2 pounds or 4 pounds, depending on the density of the product and the anticipated load. The sutherland rub tester is set to run for a set number of cycles, typically ranging from 20 to 100, to evaluate the rub resistance of printed labels.
The speed of the stroke is constant. This consistency allows the heat generated by friction to affect the test sample predictably. Excessive speed could melt wax-based additives, while too slow a speed might not generate realistic sheer forces. The tester is designed to maintain this equilibrium for accurate testing results.
Operators look for ink transfer to the receptor block after the test procedure concludes. A clean receptor block indicates high scuff resistance and durability. Heavy staining or large deposits of printed ink on the white paper signal a failure in the material's scuff resistance properties and overall label quality.
Moisture fundamentally changes the coefficient of friction and the structural integrity of paper labels. Wet rub testing introduces a liquid medium to the standard abrasion resistance test protocol. This is vital for refrigerated food packaging or products stored in humid or marine environments.
Water is the most common agent used. The receptor pad is saturated before the test involves the moving arm. Water acts as a solvent for paper fibers and certain water-based coatings, weakening the bonds and making the printed material significantly more susceptible to abrasion damage and ink transfer.
Chemical variants test resistance to product spillage. For household cleaners or industrial solvents, the test uses the actual product fluid instead of water. This resistance test determines if a spill on the outside of the packaging or labels will strip the information away through chemical ink abrasion.
Aggressive solvents like Isopropyl Alcohol (IPA) or MEK are used for rigorous quality control stress testing. These are applied to measure the degree of cure in UV inks. If the ink dissolves under a solvent rub test, the cross-linking of the polymer chains is likely incomplete, which would lead to poor durability of printed materials.
Data integrity is paramount when documenting abrasion resistance of printed materials. Simply marking a test as "passed" provides no historical value for quality control. Detailed records allow quality assurance teams to evaluate scuff resistance trends and material performance over time in the packaging industry.
Record the specifics of the test procedure immediately. This includes the weight of the block used, the set number of cycles, and the speed setting. Without these parameters, the abrasion resistance test results cannot be replicated or compared against future batches of packaging labels.
The environmental conditions during quality testing should be noted. Temperature and humidity affect paper substrates and ink drying rates. A test performed in a high-humidity environment may yield different testing results than one performed in a climate-controlled lab, especially when evaluating the rub resistance of printed paper.
Documentation must include lot numbers of both the ink and the substrate. Variations in raw materials are common. Tracing a failure back to a specific batch of coating or a new roll of film can save thousands in wasted production and preserve the reputation of your label quality.
Quantifying ink loss requires densitometry. Operators measure the color density of the printed material before and after the set number of cycles. A significant drop in density indicates that printed ink has been physically removed by abrasion from the surface, indicating a fail in rub resistance.
Haze refers to the loss of gloss or clarity on the coating. A high-gloss UV coating may not lose ink, but it might become cloudy or scratched. This micro-scratching scatters light, reducing the shelf appeal of the food packaging even if the graphics and labels remain legible.
Visual rating scales are often employed for subjective scuff testing analysis. A scale of 1 to 5, where 1 is perfect and 5 is total failure, helps standardizing visual inspections. Reference photos should be available to testers to ensure calibration of their judgment when evaluating the abrasion resistance of printed material.
Color shift is another critical metric in label quality. Rub and scuff can sometimes remove a top coating, exposing a different base layer or altering the perceived color. This is particularly problematic for brand colors that must remain consistent across different packaging labels and product labels.
Barcode verification is the ultimate functional test method. A label might look acceptable to the naked eye, but micro-abrasions across a UPC or QR code can render it unscannable. Operators must scan the code after scuff testing to verify ANSI grading and ensure the label quality meets logistics standards.
Text legibility is non-negotiable for regulatory data. Ingredient lists, pharmaceutical instructions, and hazard warnings on packaging labels must remain sharp. Any degradation that causes characters to smudge, blur or merge constitutes a critical failure in the eyes of compliance officers.
Optical Character Recognition (OCR) systems can be used to impartially score legibility of the printed material. If an automated vision system cannot read the expiration date after a rub test, the risk of supply chain rejection is high. This is a vital part of the test procedure for pharmaceutical product labels.
Small point sizes are most vulnerable to abrasion damage. While headlines might survive a 50-stroke sutherland rub test, 6-point legal text often disappears. Assessment should focus heavily on these fine details where the ink coverage is lightest and adhesion is most tenuous for high-quality packaging.
Enhancing durability of printed materials usually requires a two-pronged approach involving chemistry and mechanics. When standard inks fail rub tests, the first line of defense is often purely chemical. Slip additives, such as waxes or silicones, are added to the ink abrasion resistance strategy.
These additives bloom to the surface of the coating during drying. They lower the coefficient of friction, allowing abrasive objects to slide over the print rather than digging in. Lowering friction reduces the shear force transferred to the ink-substrate bond and improves the rub resistance of printed materials.
Increasing the coat weight of the ink is rarely the solution for ink rub. Thicker ink films are often softer and more prone to "snowplowing," where the abrasion tester pushes the ink into a pile. Thinner, harder ink films generally offer superior abrasion resistance test results in the packaging industry.
Curing parameters must be optimized for print quality. For UV systems, checking lamp output and reflector focus ensures maximum cross-linking. For water-based systems, ensuring adequate airflow and drying tunnel dwell time prevents moisture retention that softens the final film and reduces scuff resistance.
Varnish provides a liquid protective layer that cures solid. It is cost-effective and applied inline during the printing process. However, varnishes have thickness limitations. They can eventually wear through under sustained scuffing, exposing the printed ink beneath to further abrasion damage.
Lamination involves applying a secondary film over the print. This offers the highest level of abrasion resistance and scuff testing performance. The print is encapsulated between the substrate and the laminate. For the ink to be damaged, the abrasive force must first destroy the structural integrity of the laminate film.
Economic factors often dictate this choice in the packaging industry. Varnish is cheaper and sufficient for short-term disposable packaging. Lamination adds material cost and production complexity but is essential for durable goods or packaging labels exposed to harsh chemicals or extreme wear and tear.
The visual impact also differs. Lamination tends to smooth out surface irregularities, providing a distinct tactile feel and enhancing the durability of printed materials. Varnishes allow for spot application, protecting high-wear areas while leaving other areas raw for thermal transfer overprinting.
The substrate plays a massive role in ink anchorage and rub resistance. Porous papers absorb ink, which can protect it from surface rub but creates duller images. Synthetic materials like Polypropylene (PP) and Polyethylene Terephthalate (PET) keep the ink on the surface for maximum print quality.
PP and PET are naturally more durable than paper and have excellent abrasion resistance test properties. They do not fiber-tear under friction. However, because the ink sits on top of the plastic, the chemical bond is the only thing holding it in place. Surface treatment is essential to raise the dyne level for ink abrasion resistance.
PET is harder and easier to process than PP in some high-heat environments. It resists stretching and distortion during the friction process. This stability helps maintain the integrity of the ink layer during aggressive rotary abrasion tester protocols and ensures label quality over time.
Switching from paper to film necessitates a change in ink chemistry to maintain scuff resistance. Oxidizing inks for paper will never cure properly on film. UV or solvent-based inks designed for non-porous surfaces are required to pass rub resistance of printed materials testing on synthetics.
Establishing pass/fail criteria prevents subjective arguments between suppliers and buyers regarding label quality. These criteria must be agreed upon before production begins. They should be based on the realistic lifecycle of the product labels, not theoretical perfection.
Criteria should specify the exact test method. A criterion stating "must be rub resistant" is legally vague. A criterion stating "Must pass 50 strokes on Sutherland rub tester with 4lb weight with no visible ink transfer" is enforceable and provides a clear standard for hazard and safety communication.
Tolerance levels for damage must be defined. For some industrial applications, minor scuffing is acceptable as long as legibility is maintained and labels remain legible. For luxury goods and cosmetics, zero cosmetic defects from rub and scuff is typically the standard.
Sampling plans should dictate how many labels per roll or batch are subjected to the ink abrasion resistance tester. Testing a single label is statistically insignificant. A robust quality control plan tests at the beginning, middle, and end of a press run to ensure consistency.
Retail products fight for attention on the shelf. The aesthetic appearance is part of the value proposition. Therefore, abrasion outcomes for cosmetics or beverages focus heavily on gloss retention and color consistency. Even minor haze from scuffing is considered a failure in these quality and durability audits.
Industrial chemicals and logistics labels prioritize data. The label on a drum of solvent does not need to remain glossy, but the hazard pictograms and text must remain identifiable. Scuff resistance here is about safety and compliance with the standard for abrasion, not beauty.
E-commerce packaging faces unique challenges. The "last mile" delivery involves tossing, sliding, and stacking in vans. Acceptance criteria for direct-to-consumer packaging labels must account for this intense physical handling, often requiring higher durability of printed material than retail goods.
Pharma packaging bridges the gap. It requires both high aesthetic standards to prevent counterfeiting and absolute data integrity for patient safety. The criteria for these labels are among the strictest in the packaging industry for evaluating the rub resistance of printed text.
Implementation of a testing regime requires discipline. A checklist ensures that safety protocols and technical standards are followed every time. This consistency builds confidence in the testing results generated by the lab for the printing and packaging industry.
Start by calibrating the sutherland rub tester equipment. Check that the weights used or the wheels on the abrasion tester show no signs of damage. A chipped weight or a clogged abrasive wheel will skew results, leading to false passes or failures in your quality control log.
Prepare the samples uniformly. Cut labels to the exact size required by the test apparatus fixture using a precision die or template. Irregular edges can catch on the testing machine mechanism, causing rips that invalidate the ink abrasion resistance data.
Condition the samples properly before the abrasion test. Paper and film expand and contract with temperature. Ideally, samples should acclimate to the lab environment for 24 hours prior to testing to ensure the substrate moisture content is stable and results are accurate.
Step one: Define the standard. Determine if you are testing for shipping durability (dry rub) or use-case durability (wet/chemical rub). Select the appropriate receptor material (a similar sample label is attached) corresponding to the anticipated friction source.
Step two: Set the load and cycles on the sutherland rub tester. Assign a 2lb weight for standard handling or a 4lb weight for heavy shipping simulation. Set the counter to 50 strokes as a baseline for general testing, increasing to 100+ for high-durability requirements.
Step three: Execute and inspect. Run the testing machine at the designated speed. Upon completion, immediately remove the sample and the receptor block. Place them under standard lighting to avoid metamerism during inspection of the rub resistance of printed areas.
Step four: Document and archive. Photograph the result if it is borderline for scuffing. Staple the receptor strip to the job ticket or quality log. Enter the pass/fail status into the digital ERP system to track packaging labels vendor performance over time.